Deploying simple React app with Serverless / AWS
I am learning Serverless and AWS for work. Here is what I did to deploy a basic app with Serverless.
This is assuming you already have an AWS account, and have installed Serverless, the AWS SDK, and set up your AWS credentials on your machine.Simply put, though:
- To install Serverless I ran this command:
npm i serverless -g - To install the AWS SDK I ran this command:
npm i aws-sdk -g - Once you’ve set up an AWS account you can set up a new user in IAM, and save your credentials on your machine. This video shows that set-up.
In this case I already had a project made, which I set up using create-react-app. You can also set up a new serverless app by creating a new folder and running serverless create --template aws-nodejs. This is assuming you are using Node.js in the backend. There are many different runtimes you can use and templates available. You can also run create-react-app after creating your serverless template. The order you do this doesn’t seem to matter, as long as you have all the files you need.
This article from Serverless explains services, and all associated files, very well.
To deploy static pages to an S3 bucket on AWS, I installed serverless-finch in my project using npm i --save-dev serverless-finch.
When deploying a React app it is important to run the command npm run build, so you get a build folder in your project directory. This is where all your static files end up including your index.html, which S3 needs to find in order to deploy your site.
Inside the serverless.yml file
Setting up a new serverless app will give you a handler file (in my case, handler.js), a .gitignore, and a serverless.yml file. serverless.yml is where you configure your service. Serverless uses this file to work with AWS to deploy your app.
The following is what I have in my serverless.yml file:
service: react-practice

provider:
  name: aws
  stage: ${opt:stage, 'dev'}
  runtime: nodejs12.x
  region: us-west-2

functions:
  hello:
    handler: handler.hello
    #    The following are a few example events you can configure
    #    NOTE: Please make sure to change your handler code to work with those events
    #    Check the event documentation for details
    events:
      - http:
          path: hello
          method: get

plugins:
  - serverless-finch

custom:
  client:
    bucketName: julia-practice-react1
    distributionFolder: /build
    errorDocument: index.html
“service” essentially means project. It’s where you define all your functions, resources, events, plugins, and so on. Here you give the service a name.
Under “provider” is where you specify that you are using AWS and configure your runtime, region, stage, etc. Stage refers to stage of development which includes development, QA, or production. Here the “dev” stage is default, if you don’t specify a stage when you deploy.
Under each function you can have events. These are events that trigger the function to execute. In this example, and HTTP “get” request is triggering the “hello” function to execute.
If you have a “resources” section, these are the resources that your functions use when they execute. These could include database tables.
Note that under “plugins” I added “serverless-finch”.
Under “custom” and “client” we configure S3.
bucketName the bucket where S3 will place our files. It must be a globally unique name, meaning no one else in the world have have a bucket with this name.
distributionFolder is where S3 should look for our files. For React we use “/build”, since that’s where our index.html is.
S3 also requires you have an errorDocument specified. Since this is just a simple app I didn’t make one and just left it as index.html.
What Serverless does with the serverless.yml file
Serverless takes the serverless.yml file and translates it into an AWS CloudFormation template.
CloudFormation is an AWS service that allows you to manage all your AWS services/resources. You would write a template describing everything you want, and CloudFormation configures it for you.
This sounds like an improvement over configuring everything yourself in the AWS management console, though these files can still get pretty long and take time to create. That’s where Serverless comes in. Serverless takes your serverless.yml file and creates CloudFormation templates for you.
Here’s an article describing deployment with Serverless
Deployment
Note: you can set up different commands in the “scripts” section of your package.json file.
For backend stuff, especially for Lambda functions, run sls deploy --aws-profile={whatever name you set up in your aws credentials file}
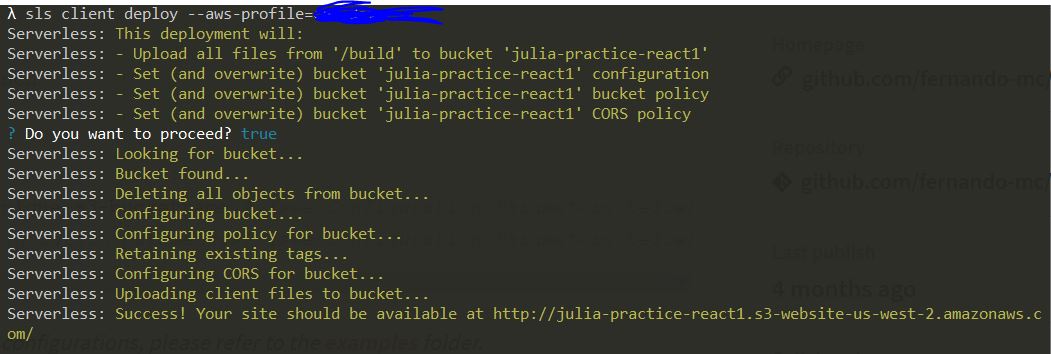
To deploy the client side, into your S3 bucket, run this command sls client deploy --aws-profile={whatever name you set up in your aws credentials file}
Your screen should look something like this if successful. You will see a link you can go to and view the site.
Errors
I got an error reading “Serverless Error: Access Denied”. This seemed strange because I never got this error for the backend deploy, so I thought it must have to do with S3. I fixed this by making my bucket public, but I don’t think this is very secure so I need to look into this further.
Another error said that I was not in the correct region. This was because my bucket and my serverless.yml file “region” did not match. I just had to quickly update my .yml file and there error was solved. I could now see my site.
